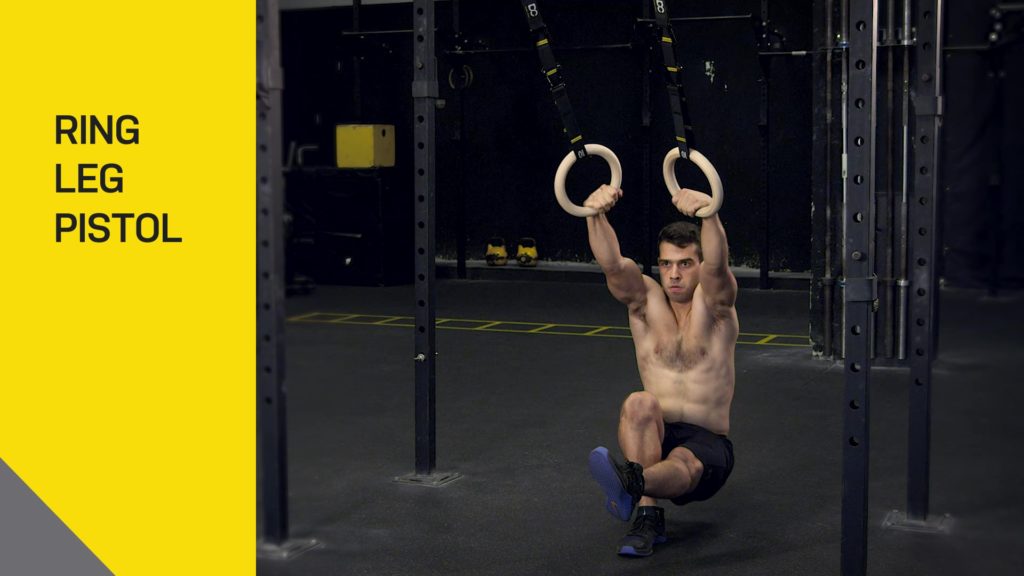
Exercise 8 : Leg Pistol

leg pistol

Difficulty: Advanced

Want to build strong sculpted legs while enhancing your athletic potential? Try out the ring assisted pistol squats that fit almost any ability level. Grab a ring and get to work.

How to

  1.  Grab your set of rings and walk the feet back beyond the rings.
  2.  Lift one foot off the floor and straighten the leg out in front.
  3. Keeping the shoulders back and hips square, slowly lower onto the supporting leg aiming to get to a depth where the thigh is parallel to the floor.
  4. Press thru the mid-foot and pull yourself as little as possible with the ring supports to the starting position.
  5. Perform all repetitions on one leg before training the other.

Guide

This one-legged exercise targets the quads, glutes, and hamstrings directly, while indirectly training core stability and balance.

By lifting one of the legs, and unstable demand is placed on the hip of the working (squatting) leg. This requires lots of coordination and balance between the muscle surrounding the joint.
At the same time the unstable nature encourages greater core strength. The benefit is balanced muscular development which not only looks better but helps promote better performance for most sports involving running cutting or jumping; not to mention making daily activities easier.

The great thing about this exercise is it is a simpler version of the unsupported pistol squat making it easy for anyone to implement into their program.

Advanced Leg Pistol

To increase the difficulty of the single leg squat you can add additional resistance to the exercise with a weighted vest, weighted bar, or dumbbells. As always, with strength training exercises add additional resistance incrementally for safe and continuous progressions.

Exercise 7 : Ring L-Sit

Ring l-sit

Difficulty: Advancede

The Ring L-Sit is a static strength hold performed on gymnastics rings that intensely trains the abs and core body.

How to

  1. Set the rings or bars to the appropriate height so that your legs won’t touch the floor.
  2. Assume the support position, supporting your body weight.
  3. Raise your legs out in front of you, keep them straight and try to hold them parallel to the ground.
    Your body should form the shape of a letter ‘L’.
  4. Maintain the hold as long as possible (under good form).

Throughout the exercise keep your torso straight, legs together, and shoulders relaxed.
Minimise any rocking or swaying movements.
Feet should be pointed away from the body, with the knees fully extended.

Guide

The L-sit is a staple gymnastics exercise that involves supporting yourself on gymnastic / fitness rings with the legs bent at a 90 degree angle to the torso, so that the body forms an ‘L’ shape.

This sounds easier than many find in practice! For the beginner, this hold is going to take some work, but once you’re competent with the L-sit (see L-sit goals section below) you will have built an extremely strong core that makes most common ab exercises seem easy!

The L-sit is an excellent core body strength hold that will develop the abdominals, adding overall muscular density without too much muscle mass.
In addition to working the abs the exercise will develop strength and endurance in the hips and triceps too.

Using rings for the l-sit adds in the element of instability and forces the core to work that little bit harder.

Beginning the L-Sit

If you’re new to the L-sit you will most likely nd it diicult to sustain. You can work up to a full straight legged L Sit using the following techniques:

Train your tuck sit (both legs tucked up to your chest and held).

Train the abs using knee raises to develop your strength, these can be done on rings, simply support your body weight and raise the knees up to the chest, hold, then return.

Use resistance bands to support the weight of the legs.

Practice! Practice the L-sit with bent knees and try to keep the thighs level, to make it easier. As you become stronger through this hold you can incrementally straighten your legs.

Some people nd the hanging L sit easier to do; this is where you hand below the rings rather than your arms supporting your body weight above the rings.

One-leg extended L-sits, and alternate legs until you build up strength to perform the exercise with both legs simultaneously.

Advanced Ring L-Sits

Weighted L-sits – perform the L-sit with ankle weights. Please take care doing this as it may place strain on the lower back.

L-sit scissor – get in position, open and close the legs in a scissor like motion.

V-sit – A truly difficult exercise. Work on raising the straight legs past horizontal and further towards the face.

L Hangs – performing the L-Sit hold in a hanging position.

Advanced Ring L-Sits

When developing your L-sit a common goal is to work torwards a three minute hold in increments of 30 seconds each set (comprising 6 sets) – 30, 60, 90, 120, 150, and 180 seconds.
When you reach this goal you will have developed excellent abdominal strength.

Exercise 6 : Ring Rollout

Ring Rollout

Difficulty: Intermediate

Ring rollouts are an excellent abdominal exercise, that generate an incredible amount of muscular tension.

How to

  1. Grip the gymnastics rings with hands just wider than shoulder-width apart in a ring push-up position.
  2. Slowly push yourself forward in a controlled rollout, stretching out the torso as far as you can without compromising form.
  3. Stop when fully stretched and pause for a moment.
  4. Return to the starting position and repeat.

Notes: Leg position can be bent, crossed or straight during the exercise.
Practice the false grip pull-up to strengthen your wrists and prepare for the muscle-up.

Guide

The ring rollout is an excellent core body exercise and places particular emphasis on developing strong, lean abdominal muscles. The exercise generates a great deal of tension in the body and requires impressive strength to control. It’s a very similar exercise to ab rollouts, using the basic ab wheel except you have greater control of your path of motion, of the exercise diiculty, and your shoulders aren’t restricted by the narrow-handle grip required for ab wheels.

Beginning the Ring Rollout

The ring rollout is a challenging exercise.

If you’re just starting out and struggling with the required strength or form you can try the following approaches:
Perform the ring rollout from a kneeling position rather than standing.
Adjust the rings so that they’re higher from the ground and the angle of the rollout is less severe.
Continue to lower the rings as you gain strength.

Beginning the Ring Rollout

The ring rollout is a challenging exercise. If you’re just starting out and struggling with the required strength or form you can try the following approaches: Perform the ring rollout from a kneeling position rather than standing Adjust the rings so that they’re higher from the ground and the angle of the rollout is less severe. Continue to lower the rings as you gain strength.

Advanced Ring Rollouts

When you’ve got to grips with the standard ring rollout and looking to add that extra
intensity you can progress using the following techniques:

Continue to lower the rings until they’re as close to the ground as possible.
Add resistance using a weighted vest.
Perform one-arm rollouts

Exercise 5 : Ring Dips

Ring dips

Difficulty: Intermediate

A fundamental gym rings exercise and popular bodyweight movement – rings dips develop excellent triceps and shoulder fexibility.

How to

  1. Adjust the height of the rings so that your feet will not touch the ground between
    repetitions.
  2. Mount the rings and assume the support position. You should be above the rings, arms straight, supporting your body weight.
  3. Lower your body down by bending at the elbows and keeping shoulders close to your sides. Keep the movement steady and controlled. If possible, continue down until your shoulders almost touch your hands for a full range of motion.
  4. Press your body back to the original starting position.

Notes: Leg position can be bent, crossed or straight during the exercise.
Practice the false grip pull-up to strengthen your wrists and prepare for the muscle-up.

Guide

Performing dips on gymnastic rings adds instability to the exercise due to the free
movement of the rings and increases muscular recruitment to help support the body.
This not only makes ring dips more difficult and rewarding than standard dips, but also
safer, as the joints are free to track naturally as the rings rotate.

Ring Dips for Beginners

Many people find the ring dip difficult, if not unachievable, when just starting out. It’s recommend that you first master the support position, which is essentially the starting position of a ring dip.
The support position involves holding your body weight whilst stationary above the rings, arms straight. When you can hold this for over twenty seconds try introducing partial dips and gradually increase the range of motion as you get stronger until you
can do full dips.

Advanced Ring Dips-Weighted ring dips

Adding additional weight to your ring dips is a very eective way of increasing the exercise intensity and to maximise development. Please note that weighted ring dips should only be attempted when fully competent with standard dips (performing at least 12 unassisted BW dips), and you should start small and incrementally add weight.
When you’re performing 15+ pull-ups it’s time to start considering advanced techniques.

A natural progression from the ring pull-up is the muscle-up.
The muscle-up is an awesome upper-body exercise that begins as a pull-up exercise and ends with your body being above the rings.

Try the following ways of adding weight to your ring dips:

  A weighted vest is a simple and versatile way of adding weight to ring dips. The great thing about weighted vests is that they’re comfortable and evenly distribute the weight over your body.

A dipping belt can be used to attach weight plates to your waist and control the amount of added resistance.
weight over your body.

Try holding a dumbbell or medicine ball between your feet or legs for added weight, but this is only usually possible for lighter weights as it can become uncomfortable and unwieldy.

Exercise 4 : Ring Pull-up

Ring Pull-up

Difficulty: Intermediate

Learn about the benefits of the fundamental pull-up exercise on gymnastic rings and develop a phenomenally strong and defined
back.

How to

  1. Adjust the height of the gym rings so that your feet will not touch the ground between repetitions.
  2. Stand under the rings and grip with either an overhand (for the pull-up), or underhand (for the chin-up) hand position. The free movement of the rings means that your grip does not have to be strictly one position or the other, and it may change throughout the exercise.
  3. Keep your arms straight and simply dead hang from the rings, keeping your body vertical.
  4. Pull your chest up toward the gymnastic rings by bending your arms. Keep the movement smooth, slow and controlled and try not to jerk any muscles as you pull-up.
  5. Pause for a moment at the top of the exercise before you start slowly lowering yourself back down.
  6. Once you are lowered back to the hanging position, pause, and repeat the exercise.

Notes: Throughout the exercise keep your torso straight, legs together, and shoulders relaxed.
Minimise any rocking or swaying movements.
Practice the false grip pull-up to strengthen your wrists and prepare for the muscle-up.

Guide

The standard, static pull-up is an incredibly effective bodyweight exercise and the ring pull-up even more so. It’s one of the best exercises to build upper-body strength and muscular definition and is a fundamental human movement.
Many people buy fitness rings primarily for pull-ups, which have many benefits over using a standard static pull-up bar. Whilst a bar or pull-up station will lock your hands in place and limit shoulder mobility, using gymnastic rings for pull-ups will exploit the free
movement of the rings and makes the motion more natural and kinder on the joints.

Many people find that they can achieve more repetitions using rings for pull-ups rather than a fixed bar. Some people who have previously injured their shoulders and find it difficult to do standard pull-ups find that they can use rings to do the exercise.

During a ring pull-up, you will usually find that the rings rotate and your hand position can change from more of an overhand, pull-up style grip into an underhand chin-up position. Whatever feels most natural and enables you to safely complete full-range
repetitions are recommended, but hand position will call different muscles into play.
When palms are facing you (the chin-up) it targets the biceps and lats more, whilst palms away from you (the pull-up) will focus more on upper back muscles.

It’s also worth noting that the rings distance apart will determine the difficulty and targeted muscle area also. The greater the distance between the rings, the wider the grip, which focuses effort on the lat muscles, whilst a narrower grip works the middle back.

Beginning Ring Pull-ups

The ring pull-up is not an easy exercise and many people can’t do one full repetition. Here are some techniques to help develop the necessary strength.

Assisted pull-ups

One technique is assisted pull-up’s – in which additional equipment is used to support a portion of your body weight and help make the exercise more achievable, yet still challenging. As you gain strength you can gradually work your way up to performing the exercise unaided, using full body weight.

Negative pull-ups

Another option to work up to full ring pull-ups is to specically train the negative (lowering) portion of the exercise. Stand on a bench (or jump into the exercise) to get to the top of the movement and simply lower yourself down as slow as possible to help build the muscles required for the full pull-up.

Ring Row

Try practicing the Ring Body Row, an exercise which uses similar muscles to the pull-up but is much easier to do.

Advanced Ring Pull-ups

When you’re performing 15+ pull-ups it’s time to start considering advanced techniques.

Weighted ring pull-ups

Adding more weight to bodyweight exercises can help you develop phenomenal strength
but should only be attempted when proficient with the non-weighted versions. You should always start out adding small amounts of weight and increment as you get stronger.

Weighted vest pull-ups
Dipping belt pull-ups
Dumbbel / medicine ball pulll-ups

Advancing to the Muscle-up

A natural progression from the ring pull-up is the muscle-up.
The muscle-up is an awesome upper-body exercise that begins as a pull-up exercise and ends with your body being above the rings.

Ring pull-up variations

■ Variation A

Wide ring pull-ups / Narrow ring pull-ups: Adjusting the distance your hands are placed from one another changes the muscles targeted during the exercise.

■ Variation B

Muscle-up: Half pull-up, half dip, double the intensity. A great exercise to progress onto when you’ve mastered the standard pull-up.

■ Variation C

One-arm ring pull-ups: For the seriously strong, single-arm pull-up training! This is a feat that few ever acheive.

Exercise 3 : Ring Push-up

Ring Push-up

Difficulty: Beginner

Ring push-ups are a slight variation on the traditional bodyweight push-up, introducing gymnastics rings to the exercise to add an element of instability.

How to

  1. Adjust the height of the rings appropriate for your fitness level (the lower the rings the more difficult the exercise).
  2. Grip the rings, keep your body straight and your legs fully extended behind you.
  3. Slowly lower yourself down towards the floor.
  4. Pause at the bottom of the exercise then push yourself back up to the starting position. Do not lock out your elbows to maintain tension throughout the muscles during the exercise.
  5. Repeat.

Notes: As you become stronger lower the rings to increase the difficulty of the exercise.

Guide

The push-up is a staple bodyweight exercise that almost everyone is familiar with.
Adding gymnastic rings into the mix suspends your hands above ground and the independent movement of the rings makes the exercise much more difficult to control, adding an injection of intensity to the exercise. As a result, you recruit more stabilizer
muscles and maximize the benefits of the exercise.

Ring push-ups are a great way to develop the chest and shoulder muscles and by
altering the height of the rings you can control the exercise difficulty.

Gymnastics rings are not simply about adding intensity, however, and ring push-ups
allow you to move through a much greater range of motion than static floor push-ups
which is beneficial for your mobility and flexibility skills. The joints are also able to track
naturally and there’s great carry over into your grip strength.

■ Wide grip ring push-up

The wide grip push-up is the same as the basic push-up except the hands are positioned further apart so they go out past your shoulders. This is one of the more difficult basic push-up exercises and focuses upon the outer muscles of the chest, rear deltoids, and back.

■ Ring triceps push-up

Similar to the basic push-up except it focuses on the triceps muscles rather than chest. Grip the rings as you would a normal push-up but as you lower your body down you keep the hands close together slightly in front of the head, rather than under the chest. Lower your body down as per the standard push-up but make sure to keep the elbows in so all the tension is focused on the tricep muscle.

■ Ring jack-knife push-up

The jack-knife push-up is one of our favorite variations and emphasizes shoulder development with a great hit to the abdominals. 

You begin in the basic pushup position and slide the rings straight forward as far as possible without bending the arms, your body stretching forwards. Maintain the hold then pull-back to the starting position.

■ Ring jack-knife push-up

Lift one leg from the floor and keep it elevated throughout the exercise. Switch legs after one set are complete.

This will further unstable the body and place emphasis on core development.

■ Pseudo-Planche Pushups

Like the standard pushup, but you grip the rings near your hips and turn the rings out
so that you are now in a reverse grip position. The Psuedo-Planche Pushup is
substantially more difficult than a regular pushup.

Beginning Ring Push-ups

Start with the basic push-up exercise and build upper-body strength. When you can
comfortably perform 20+ standard push-ups it’s a good time to start introducing
gymnastics rings.

One benefit of training with gymnastics rings is that you can easily height-adjust the
rings and control the difficulty of the exercise. The higher the rings are set, the easier
the ring push-ups become. Lower the rings as you build your strength.

Advanced Ring Push-ups

Continue to lower the rings to increase the difficulty of the exercise until they are as low as they can go without touching the ground. When you reach this point, many of the standard push-up tips can be used such as performing the exercise on one leg, adding additional resistance using a weighted vest or elevating the feet to transfer more bodyweight onto the hands and increase intensity. Try composing a push-up routine with a target number of repetitions and sets and add a few push-up variations into the mix. Your chest will thank you for it.

Exercise 1 : Support Position

Support Position

Difficulty: Beginner

Ring rows are a good beginners movement to people that are new to ring training. It’s also a progression exercise for anyone wanting to build up strength for unassisted pull-ups.

How to

  1. Set the rings to the appropriate height so your feet will not touch the foor during the exercise.
  2. Grip the rings and hoist yourself above them so your feet are of the ground and you’re
    supporting your bodyweight with the arms.
  3. Keep your arms straight and simply maintain the hold for as long as possible.

Notes: Ensure that your arms are completely straight and not resting against the straps for
support. Relying on the straps will reduce the effectiveness of the exercise.

Guide

The ring support position is the starting point for ring training beginners.The ability to support your body weight above the rings is a fundamental component of bodyweight training and practitioners should be competent in this skill before moving on to any of the more advanced exercises.

If you are new to ring training you will probably be surprised at how difficult even this basic exercise is. It takes a considerable amount of strength just to support yourself and maintain the rings at your sides.

Develop a solid support hold which you can hold for a minimum of 15 seconds with minimal movement in the body or rings before progressing with your ring training.

Exercise 2 : Ring Rows

RING ROWS

Difficulty: Beginner

Ring rows are a good beginners movement to people that are new to ring training. It’s also a progression exercise for anyone wanting to build up strength for unassisted pull-ups.

How to

  1. Set the rings to the appropriate height (the lower the rings the more difficult the exercise).
  2.  Grip the rings and lean back until your arms are stright.
  3.  Keep your body straight and pull your chest up towards the rings as high as you can.
  4. Pause briefy at the top of the exercise and then slowly lower yourself back down to the starting position. That is one full repetition.

Notes: As you become stronger lower the rings to increase the difficulty of the exercise.

Guide

The ring row, or body row as it is also known, is a relatively easy ring training exercise that targets the arms and upper back muscles. It looks like an upside down push-up and is a handy starter exercise for anyone who is not yet strong enough to do pull-ups as it uses a similar muscle set but is much easier to do.

Ring Rows for Beginners

If you find this exercise difficult try keeping the rings high, as the closer they are to the ground, the more difficult the exercise becomes. As strength increases, simply lower the rings so that your body is closer to horizontal.

Advanced Ring Rows

You can increase the difficulty of Ring Rows by raising your feet on a platform or bench. Once you have mastered the ring row try progressing into one arm ring rows or the ring pull-up.